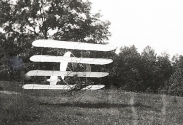
Jan Westerink, from the Netherlands, built Matthew's patented Bird Kite and did a fantastic job. Look at the size of this kite!!!
Thank you Jan for all your hard work!
(Fig. 1)
Aerial Apparatus
Working on historical kites with, most of the time, a minimum of information is quite a job of guessing, trying to get a touch of feeling or understanding of the original inventor's thoughts about construction, design, and his aeronautical knowledge.
Last week, for instance, I received a picture from France of a giant kite which was launched from a marine vessel. Although it is a very clear picture of a flying kite, it doesn't give you any information about the technical construction of the frame. bamboo or wooden rods, metal fasteners or not: many questions to answer or to guess to my best knowledge. The only thing that is sure is that this kite has to be built because of its mathematical beauty.
So if I have finished this kite and it would be possible to meet the designer, he would immediately recognize his own design, and this would start a most interesting and exciting discussion about the difference of the construction solutions I chose and the ones he made let's say one hundred years ago.

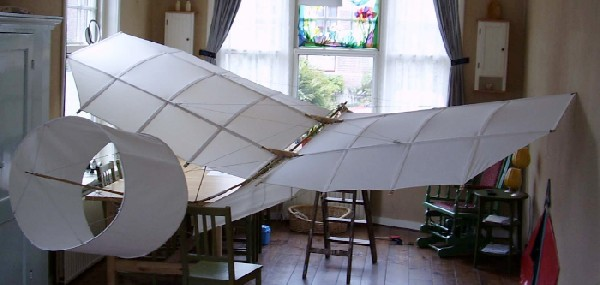
(Fig. 2)
Looking back on the Sellers project, there was just this kind of moment. Halfway through the project, after choosing the size of the kite and puzzling all the sizes of the kite together fitting to scale, I got copies of some pages of the technical diaries of Matthew Sellers himself. The really exciting moment was reading about his daily experiments and building activities, page after page getting the feeling that I was looking from his shoulders at his work, recognizing the same interest and fascination about the work from Woglom (and that he had Woglom's book Parakites [2], which is very high on my should have list).
Reading all this, I got the feeling that this time the job was done quite well. Only the measurement of the kite was somewhat bigger then Sellers was used to. But he did make one bigger kite of the size I was working on. So I allowed myself to continue with the work that was done and didn't have to do it all over.
In the mean time, the assembled parts of the kite didn't easily fit anymore in my working room. This was not so pretty because all the parts were ready and the adjusting of all the parts together had to be done. But as always,everything worked out.
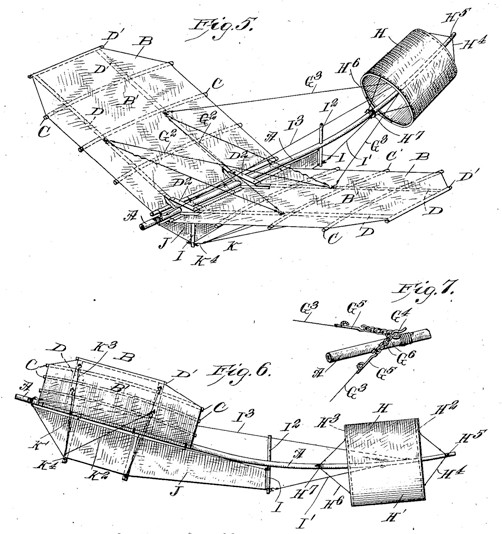
(Fig. 3)
An almost true copy
With the well described patent and the technical diary, it was not difficult to get very close to the original kite. The so-called Aerial Apparatus from the patent was noted down as Bird Kite II in the diary, while new Johan call this model no. 2, as Sellers wrote February 10, 1904. With his precise descriptions he made it very easy to reconstruct his kite even in the smallest details.
On figure 3 for instance, you can see the wing adjustment hook on the patent. This hook is placed in the cylindrical tail as shown in figure 4, a close up of the rebuilt kite.

(Fig. 4)
Sellers, who seems to be particularly proud of the coupling rods (see figure 4) on his Bird Kite, wrote in his patent: In this construction the coupling bar 2 is bent between its ends to form an eye 3 and line wire 1 passes along the shank 4, through the eye 3 and is given one or more turns about the eye and then several turns around the shank, then one or more turns at 5 around the line wire, then several turns around the shank back to the eye, then one or more turns at 6 in the eye.
So it was very clear how this kite had to be built. On the other hand, when there is only one picture that shows the shape of the kite, and it only gives you an idea about the dimensions and nothing more such as the picture from France I got last week, such a project gives you lots of freedom. Everything you do fitting within the time period the kite has been photographed is okay. You are not making a replica, just a sketch.
But what to do with another project waiting on my desk, which is well described with a clear set of drawings, but from which half the drawing is missing? Go on with the search for the missing drawings or start building the kite with what there is, so that half the kite is a replica and the other half the best guess you could make?
Sometimes you get the information you need just after finishing your kite. You finish it, go to your kiting field, make some photographs, publish your enthusiastic stories, and just after that you get an email with something like: You did a good job, but it is a pity you placed the sticks in the middle. I have some old photographs with the stick one third from.....Then you are both happy and a little sad. Sad because you apparently did something quite wrong, happy you got some desperately wanted information.
Hunting for the right materials
Almost as exciting is the search for the right materials: cotton, toile d Alsac as the French call it, maco or nanzuk for the German and cambric, nainsook or Egyptian cotton for the British and American people. All are, in the right specification, not so easy to obtain these days.
Research, experimental building, and test flying is great fun. Exciting enough to keep spending hours reading old books or sanding spruce sticks and writing a little about it. Keep in touch at www.firstkites.nl.
Jan Westerink